fddEMU atmega328p (Arduino nano) tabanlı disket sürücüsü emülatörü
fddEMU atmega328p tabanlı disket sürücüsü emülatörü
Günümüzde disket sürücü neredeyse tamamen kullanımdan kalkmış durumda. Eski CNC cihazları, numerik kontrollü dikiş makineleri ve bazı müzik aygıtları dışında pek ihtiyaç ta kalmamış gibi görünüyor. Çalışan bir disket sürücünüz olsa bile sakladığımız disketlerin bir kısmı mekanik stres, olumsuz depolama şartları vb. nedenlerle kullanılamaz hale gelmiş durumda. Yani eğer atmaya kıyamadığınız için depoya kaldırdığınız eski bilgisayarınızı eski günlerinizi hatırlamak için çalıştırmak istiyorsanız yada babanızdan kalma tarihi değeri olan bilgisayarı çalıştırarak geçmişte bilgisayarlar nasılmış görmek istiyorsanız bozuk bir floppy disk sürücü yada bozuk disketler nedeniyle kötü bir sürprizle karşılaşmanız olası. Peki, ne yapacaksınız ? Pes mi edeceksiniz ? Bodrumdan, yada çatıdan getirdiğiniz, tozlarını silip temizlediğiniz bilgisayarınızı gerisin geri kaldıracakmısınız ?
İşte tam bu noktada disket emulatörleri imdadımıza yetişiyor. Hazır bir ürün kullanmak istiyorsanız en yaygın bulunan stm32f105 yada yeni sürümünde at32f415 tabanlı gotek floppy emulatörleri yada pic tabanlı mikrokontrolör ve CLPD kullanan hxc floppy emulatörleri kullanabilirsiniz. Tabi bu yazıyı okuyorsanız muhtemelen hazır bir emulatör kullanmak değil kendiniz bir şeyler yapmak istiyorsunuz, o halde devam edelim.

Arduino artık çoğumuzun evlerine girmiş durumda, robotik kodlama vs. derken çocuklarımız dahi arduino ile tanışmaktalar. İşte benim çözümüm tam bu noktada devreye giriyor. Eğer elektronik merakınız varsa muhtemelen halihazırda elinizde bulunan parçalarla bir disket emülatörü yapabilirsiniz. Bunun için elinizde bir arduino (tercihan arduino nano), mikro sd adaptörü (Arduinonun 5 volt güç ve sinyallerini sd kartın kullanabileceği 3.3 volta çeviren adaptör), disket imajlarını depolayacağınız bir mikro sd kartı, breadboard, iki adet 1K direnç ve bunları birbirine ve bilgisayarınızdan gelen flopyy kablosuna bağlayabileceğiniz jumper kabloları gerekiyor. Kendi floppy emulatörünüzü aşağıda “fddEMU nasıl kullanılır” bölümünde anlatacağım şekilde hazırlayabilrsiniz.
Bazılarınızın aklından atmega328p gibi bir mikrokontrolörde bu emulatör nasıl çalışır ? Gibi sorular oluşabilir. Hakikaten google da “avr floppy drive emulator” aradığınızda çıkan sonuçlar bunun mümkün olmadığını söylüyor. Ancak geçenlerde hackaday de okuduğum bir makale bunun mümkün olabileceğini düşündürdü. David Hansel tarafından yazılan ArduinoFDC ile arduino’nuzu disket sürücünüze bağlayarak eski disketlerinizi okuyabiliyor, içlerindeki dosyaları görebilyor hatta dilerseniz disketin bir imajını bilgisayarınıza kaydedebiliyorsunuz. Makaleye yazılan bazı yorumlarda bunun mümkün olmadığı 16Mhz de çalışan AVR atmega328 işlemcinin gücünün buna yetmeyeceği söylenmekte ise de gerçek ortadaydı ve David Hansel bir arduino uno’yu FDC yani “Floppy Drive Controller” olarak programlamayı başarmış, üstüne disket içeriğini inceleyebileceğiniz dos benzeri bir arayüz “arduDOS” ve disket imajını seri port üzerinden bilgisayarınıza kopyalayabileceğiniz “Z modem” protokolünü dahi eklemiş.
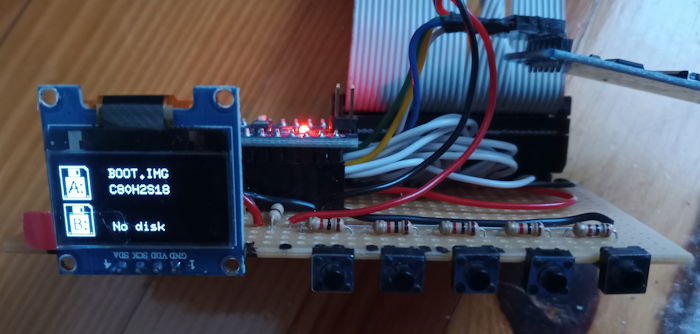
Bu makaleyi okur okumaz aklımda beliren fikir David Hansel’in GNU GPL v3 lisansı ile yayınladığı ArduinoFDC kodu üzerinde çalışarak bunu bir floppy emulatörü için uygun hale getirmekti. Kodu emülatör olarak uyarladıktan sonra bağımsız olarak kullanılabilmesi için 0.96” oled ekran (SSD1306) ve kontrol için butonlar ekledim. Yalnız arduino-floppy kontrolör, arduino-sd adaptörü, arduino-Oled ve arduino-seri port bağlantılarını yaptıktan sonra geriye sadece A6 ve A7 pinleri kalıyordu. Ve bu pinlerin hiç bir dijital devresi yok sadece analog kıyaslayıcıya bağlılar. Yani yapılacak tek şey “resistor ladder” direnç merdiveni denilen yöntemi kullanmaktı. Ben de bu yöntemle tuşları A7 pinine bağladım. Neticede fddEMU ortaya çıktı.
fddEMU nasıl kullanılır

fddEMU releases adresinden indireceğiniz fddEMU.hex dosyasınını “avrdude -B 10 -p m328p -c arduino -P /dev/ttyUSB0 -U flash:w:fddEMU.hex” komutu ile arduinonuza programlayabilirsiniz. Burada dikkat edilecek nokta programlayacığınız arduino farklı bir porta bağlı ise (örneğin “/dev/ttyUSB2 yada COM4”) “/dev/ttyUSB0” yerine kendi port adresinizi yazmanız. Daha sonra aşağıdaki pin bağlantı tablosuna göre bağlantıları yapmanız gerekiyor.
Pin bağlantı tablosu (tek sürücü)
| Pin | Arduino Nano | FDD Ribbon Cable |
|---|---|---|
| GND | GND | 1 (GND) |
| STEP | D2 | 20 (Step pulse) |
| STEP_DIR | D3 | 18 (Direction) |
| MOTOR_A | D4 | 16 (Motor on B) |
| SELECT_A | D5 | 12 (Drive Select B) |
| SIDE | D6 | 32 (Select head) |
| INDEX | D7 | 8 (Index pulse) |
| READDATA | D8 | 22 (Write data) |
| WRITEDATA | D9 | 30 (Read data) |
| WRITE_GATE | A0 | 24 (Write enable) |
| TRACK_0 | A1 | 26 (Track zero) |
| WRITE_PROTECT | A2 | 28 (Write protect) |
| DISK_CHANGE | A3 | 34 (Disk changed) |
Pin bağlantı tablosu (çift sürücü)
| Pin | Arduino Nano | FDD Ribbon Cable |
|---|---|---|
| GND | GND | 1 (GND) |
| STEP | D2 | 20 (Step pulse) |
| STEP_DIR | D3 | 18 (Direction) |
| SELECT_B | D4 | 14 (Drive Select A) |
| SELECT_A | D5 | 12 (Drive Select B) |
| SIDE | D6 | 32 (Select head) |
| INDEX | D7 | 8 (Index pulse) |
| READDATA | D8 | 22 (Write data) |
| WRITEDATA | D9 | 30 (Read data) |
| WRITE_GATE | A0 | 24 (Write enable) |
| TRACK_0 | A1 | 26 (Track zero) |
| WRITE_PROTECT | A2 | 28 (Write protect) |
| DISK_CHANGE | A3 | 34 (Disk changed) |
| Pin | Arduino Nano | Micro SD adaptörü |
|---|---|---|
| Slave Select | D10 | CS |
| MOSI | D11 | MOSI |
| MISO | D12 | MISO |
| SCK | D13 | SCK |
| VCC | 5V | VCC |
| GND | GND | GND |
| Pin | Arduino Nano | 0.96" OLED SSD1306 |
|---|---|---|
| GND | GND | GND |
| VCC | 5V | VCC |
| SDA | A4 | SDA |
| SCL | A3 | SCL |
A7 (ADC7) bağlantı şeması

“Direnç merdiveni” yöntemi ile 5 butonun ADC7’ye bağlanması.
Bu aşamaya geldiyseniz tebrik ederim, artık elinizde çalışan bir disket sürücü emülatörünüz var.

Böyle bir çalışmanın Türkçe kaynak olarak sunulması bu konularda ilgisi olanlar için çok kıymetli. Çalışmanız ve detaylı anlatımınız için çok teşekkür ederim. Faydalı çalışmalarınızın devamını dilerim.
YanıtlaSilTeşekkür ederim.
SilHi. I make retro computer news videos on youtube and was wondering about making a short video about this. But I have some questions. Does this have any advantages over the gotek drive?
YanıtlaSilSo I am just replying to my own comment here. I was thinking, and perhaps this can be developed with a nice file manager with a bigger screen? So that you could more easily navigate lots and lots of floppy images in categories? that would make it super useful compared to a regular gotek.
SilfddEMU's advantages over commercially available floppy emulators are it's diy design and availability (Arduino nano is easily available, perhaps you already have it). And if you are into embedded programming, it's hackability (it can easily be repurposed). On the other hand a gotek has a powerful 32 bit arm based microcontroller with lots of ram and built-in dma controller, so performance wise there is no comparison.
YanıtlaSilFor makers building something with your hands gives you satisfaction that buying can not give. And running floppy drive emulation on an atmega328 with 16 MHz CPU and only 2 kilobytes of ram which is said to be impossible (a Google search of AVR floppy emulator would tell you as such) is really nice. And if all you need is booting up your old PC why wait for a new gotek to be shipped ?
ok thanks for the reply :) It's true I do have an Arduino laying around
SilHi Ekim,
Silit seems that Google was able to return some result if I use the proper search phrase. Instead of "AVR" I put "Arduino floppy emulator" and found this - https://github.com/EvgeniyRU/ZX_FDD_Emulator. But of course this project is limited to particular platform: ancient 8-bit computer with certain FDC controller. Your solution is much more universal and supports what's called "standard" in modern PC era. But back then in '80s we didn't have anything established as standard :).
Thanks for the project and effort you put into it!
Thank you for your consideration of fddEMU project. Forgive me for I don't know who Ekim is.
SilZX FDD Emulator by EvgeniyRU is really a great floppy drive emulator, especially using UART as SPI (MSPIM) is really a novel idea that I think it is ingenious. I have written about it previously. It just doesn't support writing to emulated floppy disk.
Sorry, I could see the word Ekim several times on the page therefore I guessed it's a signature of an author. But it seems to be a name of the month instead. I need to get more proficient with Turkish :)
SilHello, I found Your nice project. I working about old computers and need replace classical floppy disk drive. I try make "functional sample" on my owned PCB. For my using I need easier circuit - no need very HW configurations and making home diy two-sided PCB is unnecessarily complicated. I maked functional PCB a zkouším s fddEMU pracovat. I trieing on classical PC, where is drive detected OK, but have some problems. Program SamDisk from Simon Owen reported high rotation speed "floppy" - 313rpm instead 300rpm. I tryed read content of disk image (360kB), seems OK, but sector 1 on side 0 and track 0 is not readed. Next sectors are readed OK (some differences on header of every track in .DSK file, but readed data identical). When I try write image with formatting to "floppy", fddEMU freezed and help only restart PC.
SilIs possible give some advice, what i doing wrong?
Many thanks.
Petr
P.S.: If you compilled new version, is possible make with rotated display and without Virtual Disk. Many thanks. Excuse of my english. P.
Hello Petr, and thank you for your interest in fddEMU.
SilAbout the PCB: sure a PCB helps connecting fddEMU (Arduino nano or pro micro) to the computer but not exactly required, jumper wires might also do the job.
About the wrong sector problem: There was previously an error in lba calculation -although this error shouldn't happen at track:0 head:0 sector:1- causing wrong sectors being read from and written to non 1.44MB floppy images (I only have 3.5" 1.44MB HD floppy drives), thankfully @ikonko (Ikon) has pointed out and fixed. Latest version shouln't have that error anymore. Latest release as of now is fda9cc2 (automated release) which you can download from fddEMU releases page.
And what is causing fddEMU to freeze while writing to emulated floppy image is probably lack of external pullup resistor. A 1K pullup to 5V at pin 22 (Write data) of floppy connector usually helps with this.
180 degrees rotation of display is possible and a compile time option in makefile. You might want to build fddEMU with "make FLIP=0" or if you dont want to build yourself, you can make github build fddEMU for you:
fork the repository in github then change .github/workflows/build-firmware.yml #atmega328p-single target make command to "run: make MCU=atmega328p GUI=1 SERIAL=1 DUAL=0 VFFS=1 DEBUG=0 FLIP=0" after the change the CI script should run automatically and build the firmware and post it in your fork's releases.
If it doesn't work please inform me.
Many thanks for your fast response. Problem with bad readed first sector of image is my mistake - after not success formatting stayed sector damaged. With fresh image working fine. Reading is (at least for PC) allright - boot MS-DOS 2.11 is OK.
YanıtlaSilI have burned lastest firmware, pull-up resistors I have on specified inputs (20, 22 and 24) from begin, but formatting or writing is still problem. Now I measured connection betwen Arduino, FDD connector and pull-up resistors and not found any problems. Under DOS is formatting done, but image is not clear, directory contains nonsensical files...
I thinked about new version FW repair simulated speed of rotation...
Recompiling FW is a little problem - I not have enought expirence with this. I have installed Atmel Studio 7 (long time ago), it is possible fddEMU compile with this?
P.
As far as I know sector write operations should work. As fddEMU emulates floppy disk sector by sector instead of track by track, low level formatting of floppy image on fddEMU is not supported, low level format requires all track data, headers and interleave written at once.
SilIf after DOS format SD card contains non-sensical files this might be related to bug I mentioned, that caused non 1.44MB images read/written erroneously, which had been fixed in latest release.
Simon Owen's SamDisk reporting wrong rpm might be caused by fddEMU skipping some interleave -inter sector filler- to push sectors faster, but this should have no effect on Floppy Drive Controller's ability to read/write data.
fddEMU is built with avr-gcc/avr-binutils but as I said before a build environment is not necessary to compile fddEMU, if you have a github account -which is free- you can fork fddEMU than modify the code/Makefile/CI script as you like. Automated CI script .github/workflows/build-firmware.yml rebuilds the firmware after every commit then push resulting files to releases page where you can download.
P.S.: Sorry for the latest release download link before, it should work now. If things doesn't work please comment.
Hello,
YanıtlaSilIs it possible to recompile on the LGT8F328P LQFP32 processor? There is a pin-to-pin compatible module available with Arduino nano.
LGT8F328P LQFP32 is faster than Atmega 328p and the module is very cheap.
I don't know anything about programming, so I'm asking because this project is very easy to do and I like it very much. I would like to build it for my 286@16MHz on HT-12
Best regards